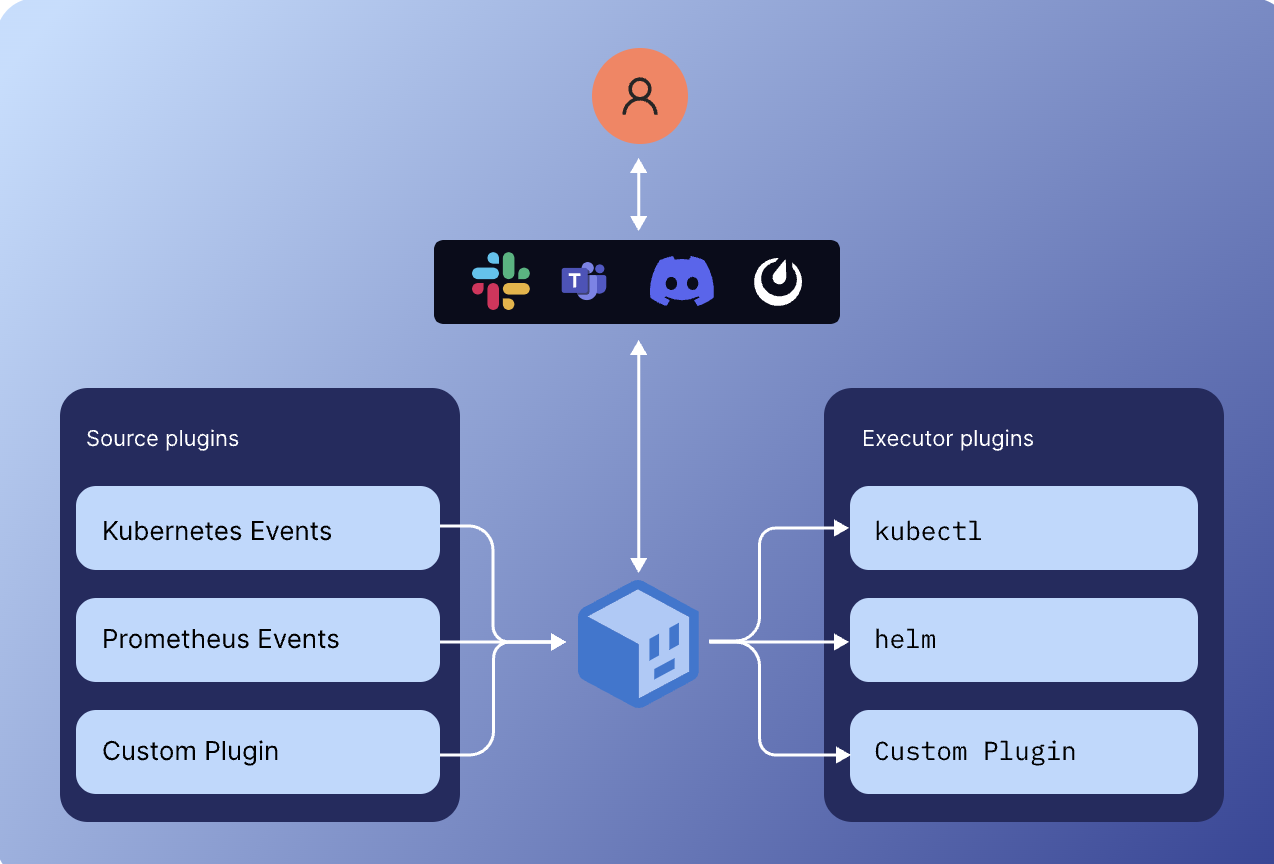
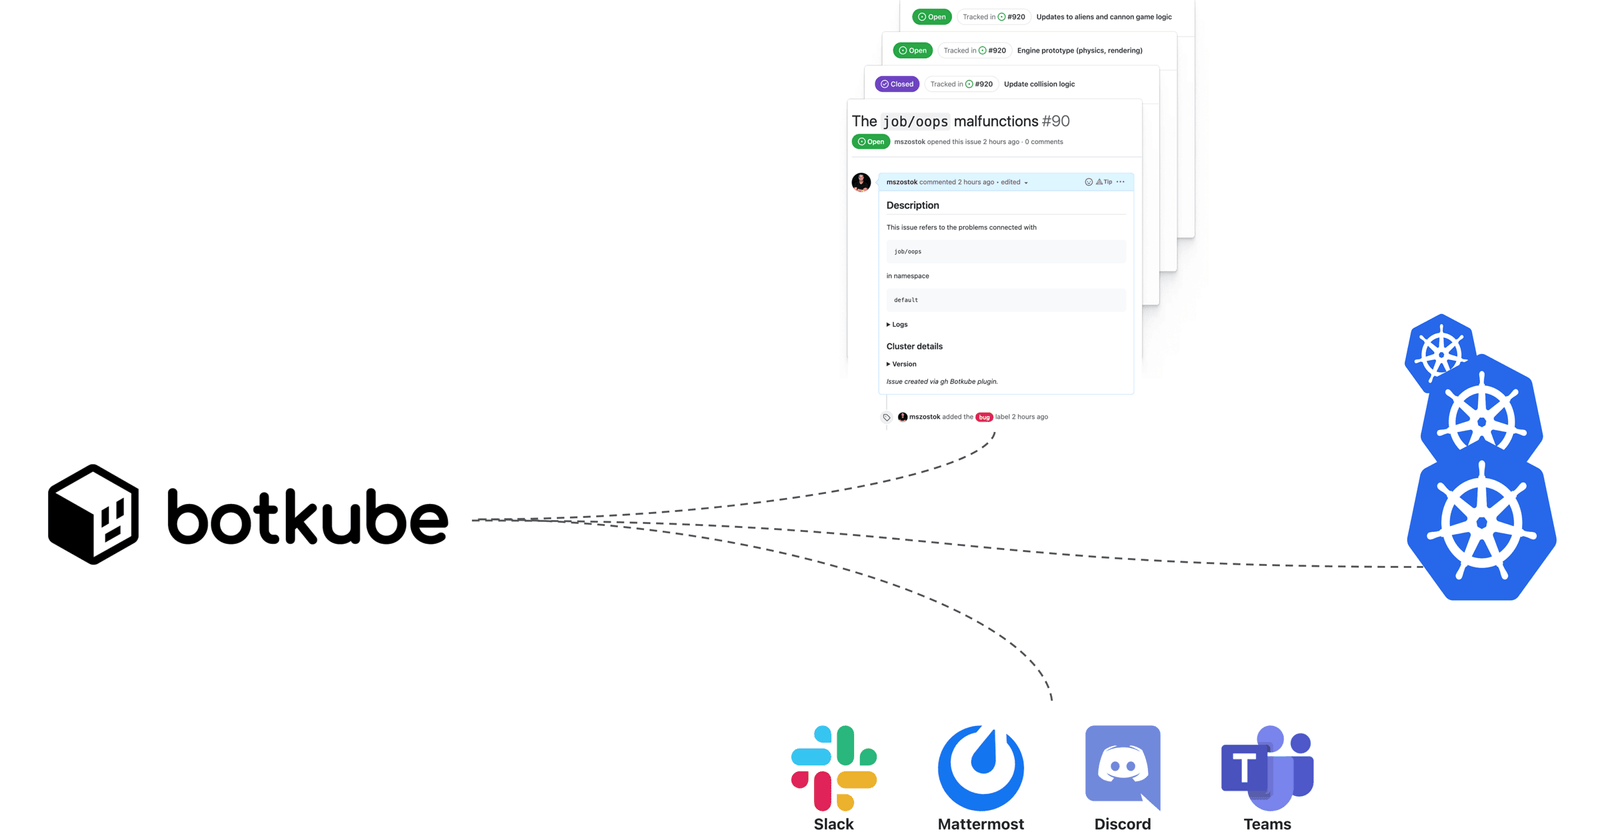
BotKube is a tool that allows for the integration of alerts and notifications from Kubernetes into messaging platforms such as Slack, Microsoft Teams, Discord and Telegram. BotKube works by monitoring events and logs from Kubernetes resources and forwarding them to the messaging platform of your choice. With BotKube, you can set up alerts and notifications for various events, such as pod creation or deletion, node status changes, and more.
In this blog, we will walk you through the
- Installation of BotKube on Kubernetes
- Use-cases of Botkube with code snippets
- How to monitor your Kubernetes cluster with Botkube
- Debugging critical deployments with Botkube
- Recommendations for standard practices by running checks on – Kubernetes resources with Botkube
Step 1: Create a Bot Account
You need to create a bot account on the messaging platform of your choice to use BotKube. For example, to use BotKube with Slack, you need to create a bot account on Slack. Similarly, for Microsoft Teams, you need to create a bot account on Microsoft Teams.
Step 2: Deploy BotKube to Kubernetes
BotKube can be deployed to Kubernetes using Helm. To deploy BotKube, you can use the following command:
helm repo add botkube https://botkube.com/helm/charts/ helm install botkube botkube/botkube --set config.bot.slack.enabled=true --set config.bot.slack.token=<SLACK_BOT_TOKEN> --set config.bot.slack.channel=<SLACK_CHANNEL_NAME>
Replace the and with your Slack bot token and the name of the Slack channel you want to use for notifications.
Once BotKube is deployed, it will start monitoring Kubernetes resources and forwarding notifications to the messaging platform of your choice.
Step 3. Configuring Botkube to Send Notifications on Slack
Once we have installed Botkube on our Kubernetes cluster, we need to configure it to send notifications on Slack. For this, we need to provide the Slack token and channel name while installing Botkube using the –set flag.
The Slack token can be generated by creating a new bot on Slack and obtaining the token from the bot’s configuration page. The channel name is the name of the Slack channel where we want to send notifications.
Step 4. Setting up Botkube Rules
After installing and configuring Botkube, we need to set up rules to specify the conditions under which notifications should be sent. Botkube rules can be defined using Kubernetes Custom Resource Definitions (CRDs).
Botkube supports a variety of CRDs, including DeploymentRule, PodRule, NodeRule, EventRule, and NamespaceRule. Each rule can be customized to specify different conditions based on the resource’s metadata or annotations.
For example, to set up a rule that sends a notification when a Pod is in the Pending state for more than 5 minutes, we can create a PodRule with the following definition:
apiVersion: botkube.com/v1alpha1
kind: PodRule
metadata:
  name: pending-pod
spec:
  match:
    phases:
      - Pending
    for:
      minutes: 5
  notify:
    slack:
      message: "Pod {{.Name}} is in Pending state for more than 5 minutes"
This rule matches Pods in the Pending phase for more than 5 minutes and sends a notification to Slack with the specified message.
Similarly, we can set up rules for other resources, such as Deployments, Nodes, Namespaces, and Events, to receive notifications on Slack when specific conditions are met.
Step 5. Debugging critical deployments
Debugging critical deployments is a crucial task for any developer or system administrator. When working with Kubernetes, there may be instances when deployments fail or critical issues arise, which can lead to serious consequences. This is where Botkube can be useful in providing real-time notifications and alerts to help you quickly diagnose and resolve issues.
Here we will explore how to use Botkube to monitor and debug critical deployments. We will be using a real application, a simple Flask web application, to demonstrate how Botkube can be used to detect and respond to deployment failures and other issues.
Prerequisites
Before we begin, make sure you have the following installed:
- A Kubernetes cluster
- Botkube installed and configured on your Kubernetes cluster Slack workspace and bot access token
- Setting up the Flask application
We will be using a simple Flask web application for this demonstration. Create a new directory called flask-app and navigate to it. In this directory, create a file called app.py with the following code:
from flask import Flask

app = Flask(__name__)

@app.route('/')
def hello_world():
    return 'Hello, World!'

if __name__ == '__main__':
    app.run(debug=True, host='0.0.0.0')
This creates a simple Flask application that responds with Hello, World! when accessed.
Create a Dockerfile in the same directory with the following code:
FROM python:3.9-alpine

WORKDIR /app

COPY requirements.txt .

RUN apk add --no-cache gcc musl-dev linux-headers && \
    pip install --no-cache-dir -r requirements.txt && \
    apk del gcc musl-dev linux-headers

COPY . .

CMD ["python", "app.py"]
This Dockerfile sets up a lightweight Alpine Linux container with Python 3.9, installs the necessary requirements, and runs the Flask application.
Deploying the Flask application to Kubernetes
Now deploy the Flask application on Kubernetes, we need to create a deployment and a service. Create a file called flask-app.yaml with the following content:
apiVersion: apps/v1
kind: Deployment
metadata:
  name: flask-app
spec:
  replicas: 1
  selector:
    matchLabels:
      app: flask-app
  template:
    metadata:
      labels:
        app: flask-app
    spec:
      containers:
      - name: flask-app
        image: flask-app:latest
        ports:
        - containerPort: 5000
---
apiVersion: v1
kind: Service
metadata:
  name: flask-app
spec:
  selector:
    app: flask-app
  ports:
    - name: http
      port: 80
      targetPort: 5000
  type: ClusterIP
The above YAML file creates a deployment and a service for our Flask application. The deployment has one replica and uses the Docker image we built in the previous step. The service exposes the Flask application on port 80.
Deploy the Flask application on Kubernetes using the following command:
Step 6. Configure Botkube
BotKube needs to be configured to monitor the Flask application. In this step, we will configure BotKube using a YAML file.
Create a file named botkube-config.yaml in the root directory of the Flask application.
Add the following configuration to the botkube-config.yaml file:
apiVersion: "v1"
kind: Config
notifiers:
  - name: slack
    slack:
      token: <SLACK_BOT_TOKEN>
      channel: <SLACK_CHANNEL_NAME>
      actions:
        - send
receivers:
  - name: flask-app
    rules:
      - resources:
          - deployment/flask-app
        events:
          - create
          - update
        template: |
          Deployment {{.ObjectMeta.Name}} has been {{.Type}}d
        notifiers:
          - slack
This configuration file defines the Slack notifier and a receiver for the Flask application. The notifier sends messages to a Slack channel, and the receiver specifies the events to be monitored and the actions to be taken when these events occur.
Replace with your Slack bot token and with the name of the Slack channel you want to receive notifications in.
In this configuration, we are monitoring the Flask application’s deployment object for create and update events. Whenever a deployment is created or updated, BotKube will send a message to the Slack channel.
Save the botkube-config.yaml file.
Step 7. Deploy Botkube
In this step, we will deploy BotKube to the Kubernetes cluster.
Create a file named botkube-deployment.yaml in the root directory of the Flask application.
Add the following deployment configuration to the botkube-deployment.yaml file:
apiVersion: apps/v1
kind: Deployment
metadata:
  name: botkube
spec:
  selector:
    matchLabels:
      app: botkube
  replicas: 1
  template:
    metadata:
      labels:
        app: botkube
    spec:
      containers:
        - name: botkube
          image: infracloudio/botkube:latest
          command: ["/bin/sh"]
          args: ["-c", "/usr/local/bin/botkube start --config /config/botkube-config.yaml"]
          env:
            - name: SLACK_BOT_TOKEN
              value: <SLACK_BOT_TOKEN>
          volumeMounts:
            - name: config
              mountPath: /config
      volumes:
        - name: config
          configMap:
            name: botkube-config
This configuration creates a single replica deployment for BotKube. The container runs the botkube command and loads the botkube-config.yaml file from a ConfigMap. Replace with your Slack bot token.
Create a ConfigMap named botkube-config using the botkube-config.yaml file.
kubectl create configmap botkube-config --from-file=botkube-config.yaml
Deploy the BotKube deployment and verify that BotKube is running
NAME                       READY   STATUS    RESTARTS   AGE
botkube-84f784d8d9-6vd94   1/1     Running   0          1m
Step 8. Deploy the Botkube Flask Application
Once the Flask app and the Botkube client are tested and ready, we can deploy the application on a server. There are different ways to deploy a Flask app on a server, but one of the easiest ways is to use Docker.
For this, we need to create a Dockerfile in the root directory of the Flask app. A Dockerfile is a file that contains all the commands that are needed to create a Docker image. A Docker image is a lightweight, stand-alone, and executable package that includes everything needed to run a piece of software, including the code, a runtime, libraries, environment variables, and config files.
Here’s an example of a Dockerfile that we can use for our Flask app:
# Use the official Python image as the base image
FROM python:3.9-slim-buster

# Set the working directory to /app
WORKDIR /app

# Copy the requirements file to the working directory
COPY requirements.txt .

# Install the dependencies
RUN pip install --no-cache-dir -r requirements.txt

# Copy the rest of the application code to the working directory
COPY . .

# Set the environment variables
ENV FLASK_APP=app.py

# Expose port 5000 for the Flask app
EXPOSE 5000

# Start the Flask app
CMD ["flask", "run", "--host=0.0.0.0"]
This Dockerfile starts with the official Python 3.9 slim-buster image and sets the working directory to /app. Then it copies the requirements file to the working directory and installs the dependencies using pip. After that, it copies the rest of the application code to the working directory and sets the environment variable FLASK_APP to app.py. Finally, it exposes port 5000 for the Flask app and starts the app using the flask run command.
To build the Docker image, we need to run the following command in the root directory of the Flask app:
docker build -t botkube-flask-app .
This command builds a Docker image with the tag botkube-flask-app. The . at the end specifies the build context, which is the root directory of the Flask app.
Once the Docker image is built, we can run it using the following command:
docker run -p 5000:5000 botkube-flask-appThis command starts a container from the botkube-flask-app image and maps port 5000 of the container to port 5000 of the host machine. Now we can access the Flask app by navigating to http://localhost:5000/ in a web browser.
Conclusion
In conclusion, Botkube is a powerful and versatile tool for monitoring Kubernetes clusters and applications. With its flexible configuration and integration options, Botkube can be customized to fit a wide range of use cases and environments. By providing real-time notifications, alerts, and logs, Botkube helps ensure the health and stability of your Kubernetes-based applications, as well as the underlying infrastructure.
Botkube’s support for various messaging platforms and channels makes it easy to integrate with existing workflows and tools, and its extensive logging and debugging features help diagnose issues quickly and efficiently. With its open-source nature and active community, Botkube is constantly evolving, with new features and improvements being added regularly.
In nutshell, Botkube is an excellent tool for Kubernetes administrators, DevOps teams, and developers who want to ensure the smooth operation and reliable performance of their Kubernetes-based applications. Whether you’re just getting started with Kubernetes or have been using it for a while, Botkube is definitely worth considering as a valuable addition to your monitoring and management toolbox.
Leave a Reply